#
Managing your DNS
After creating so many deployments, logging into your DNS provider to map each service to a domain gets old fast. It would be so much nicer if kubernetes could do that for you, right?
Say no more! Because with the help of external-dns, it can.
⛔ Dependencies required
You'll need to install Helm to continue. If you don't have it yet, refer back to Getting Started.
You'll also need to set up your domain name with Cloudflare to follow along, which you should have already if you bought a domain through them. But external-dns supports many other providers too.
You might wonder how this works. The long and short of it is that external-dns will keep an eye out for new deployments that have an ingress. For each one it finds, it'll create a DNS record that points back to your cluster.
This goes hand-in-hand with the previous work to set up cert-manager, as it will automatically use the domain that you generated a certificate for.
#
Requirements
You know the drill. Here's what we need to do:
- Create a Cloudflare account
- Add your domain to Cloudflare
- Change SSL mode to Strict
- Create an API token
- Add the Helm repo
- Install the Helm chart
#
Cloudflare setup
If you aren't already using Cloudflare, because your domain was bought elsewhere, all you need to do to catch up is sign up for a new account and then create a new website. Cloudflare will ask for your domain and then walk you through some setup, like changing your nameservers and such. Trust the process, as it were.
#
SSL Strict Mode
📖 Prefer to RTFM? Guide out of date?
Check out the official Cloudflare documentation.
The next bit is important, because if you don't do it, you'll have problems with endless redirects when trying to access your deployments. This happens because your cluster is already set up to use HTTPS and will automatically upgrade HTTP requests, and Cloudflare's default config conflicts with that.
In order to fix this, go to the SSL/TLS page from the sidebar panel and smash that Configure button*. In the section labeled Custom SSL/TLS, you want to tick the Full (Strict) option and then save the changes.
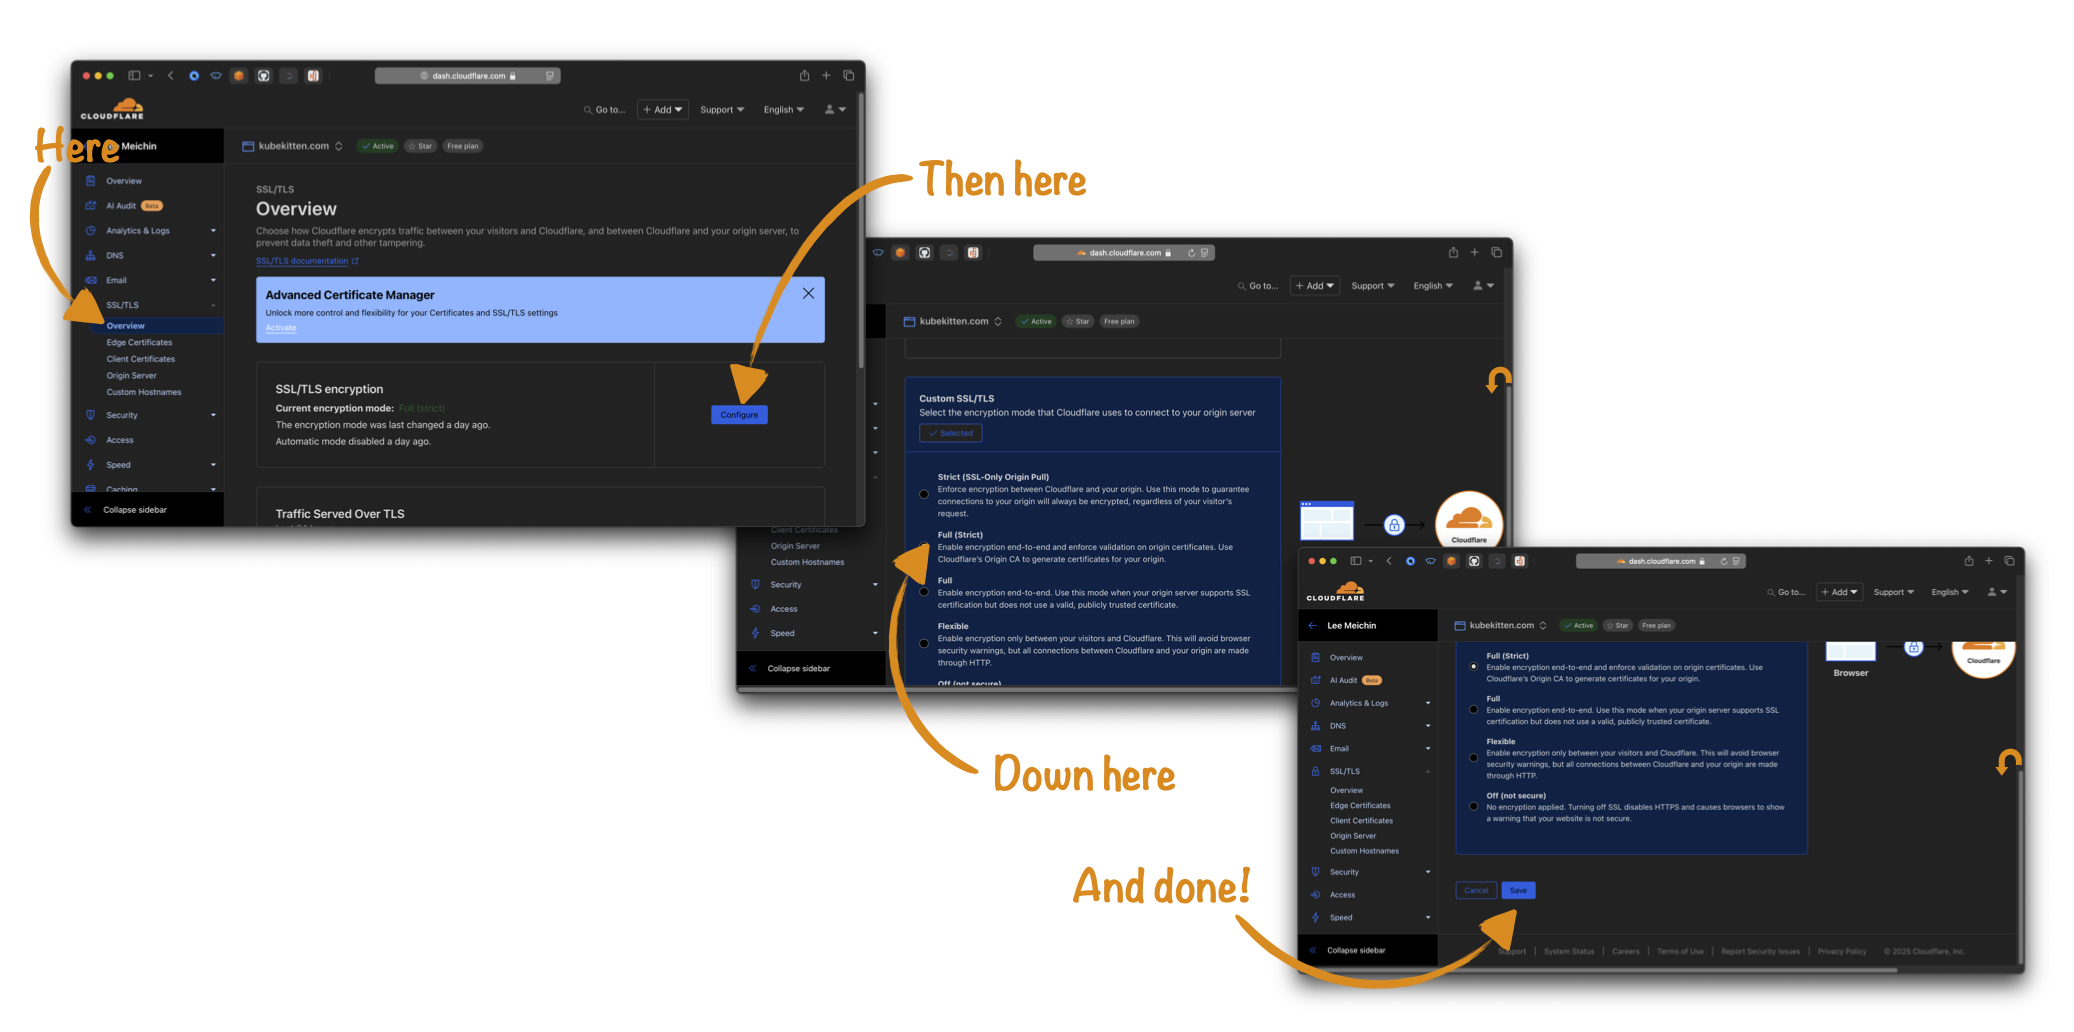
*(don't forget to like and subscribe)
#
Creating an API token
📖 Prefer to RTFM? Guide out of date?
Check out the official Cloudflare documentation.
All you need now is an API token so that your K8S cluster can talk to Cloudflare on your behalf. To procure one of these, you need to go back to the Cloudflare dashboard and then to the Manage Account page from the sidebar. This will reveal the Account API Tokens page where you can create a new token for your cluster.
It's good practice to create a token with only the minimum permissions required, because this limits the damage that can be caused if someone else gets their hands on it. In this case, you just need to select the Edit Zone template and then choose the domain (or domains if you have more than one!) you want to manage. The Edit Zone permission makes it possible to add and remove DNS records, which is all external-dns needs to do.
Don't forget!
You'll only see the token once, so make sure to keep it handy while you continue the setup. If you lose it, you'll need to create a fresh token.
#
Install your Helm chart
Back to familiar territory now!
#
Add the external-dns repo
helm repo add external-dns https://kubernetes-sigs.github.io/external-dns
#
Create a new namespace
kubectl create namespace external-dns
#
Configure the chart
provider:
  name: cloudflare
extraArgs:
  - --cloudflare-proxied
env:
  - name: CF_API_TOKEN
    valueFrom:
      secretKeyRef:
        name: cloudflare-api-token
        key: token
Oh, what's this then? A secretKeyRef? Time for a quick sidebar.
#
Create a secret
It's bad form to store secret values like API tokens in plain text, either in your config files or in your git repo. If someone gets access to it or if your repo is public then they'll have the keys to the kingdom. No bueno. Don't expect that having an obscure repo will protect you either, because bad guys out there are scanning public github repos every second looking for tasty morsels like this.
Kubernetes' simple solution to this is the Secret resource, which stores your sensitive data in an encrypted form. When other resources, like services or deployments or Helm charts, reference this secret, it will be given to them in unencrypted form. Kinda like env vars, in a fashion.
Because you don't want to store the secret in plain text in your repo, you can't add a YAML file as you've done with other resources (or... can you!?*). Instead, you'll add the secret through the command line:
CF_API_TOKEN=<your-api-token-from-before>
kubectl create secret generic cloudflare-api-token --from-literal=token=$CF_API_TOKEN --namespace external-dns
The string passed to --from-literal-token looks like key=value, where key in this case is token and value is the API token you got from Cloudflare. Both the secret name (cloudflare-api-token) and the key (token)
are required when using secretKeyRef in your config.
*We'll cover a way to store secrets in your repo securely—so you don't lose them if your cluster goes away—in an upcoming chapter on Secrets Management
#
Install the chart
helm install external-dns external-dns/external-dns --namespace external-dns --file helm/external-dns.yml
#
Recap
You now have a minimum viable cluster! In fact, a bit more than minimum! Let's recap.
First, you set up a brand spanking new kubernetes cluster with K3S. Ho-lee shit.
Then you got to grips with some of the fundamentals, the basic building blocks, of Kubernetes. God dayum.
Armed with that wisdom, you created a load balancer so you can serve multiple apps to the internet. Oh hells yeah!
Because you were on a roll, you enabled SSL/TLS access so you could use HTTPS. Boom, headshot!
And finally, you wired it all up with Cloudflare to connect your services to custom domains. Awesome sauce!
If I didn't know better, you just graduated from a Kube Kitten to a Kube Kat. That's one badass motherfluffer right there.
#
But wait!
The story's not over yet. Now you've got all the basics in place, you're gonna need some stuff to deploy, like a static website. Maybe you want some monitoring, or maybe you want to set up continous integration to automate your deployments. How about running your own private docker registry to store your images? And there has to be a better way to manage secrets so it's easy to spin up your cluster from scratch again, no?
All that and more is coming up in the next chapters. Stay tuned! 🚀